Seawall Installation Guidelines.
- Always set a drive guide or template to assure a straight, firm surface to drive sheets against. NEVER ATTEMPT TO DRIVE SHEETS ALONG A STRING LINE ONLY. Run a string line and set temporary posts (usually 4 x 4 posts) where the completed wall will stand. This drive guide (generally a 4 x 6 or 6 x 6) is tack nailed, c clamped, or screwed into the temporary posts. This drive guide can become part of the permanent wale/cap system for a wood capped wall. For a more in-depth, comprehensive guide to building a seawall, please see our How to Build and Install a Seawall post.

Driving Guide - Thread a pair of sheets and drive in pairs. This will decrease seawall installation time as well as help keep the sheets plumb and straight. Upon reaching desired embedment, screw a lag screw into the flange of the leading Sheet. NOTE: IT IS CRITICAL TO GET THE 1ST PAIR OF SHEETS STRAIGHT AND PLUMB AS THE REST OF THE WALL WILL FOLLOW SUIT.

Driving In Pairs - Be sure to level each pair of sheets in both the vertical and horizontal directions and continue driving down the length of the wall. It is recommended to lead with the male lock so that soil and debris can easily escape through the female.
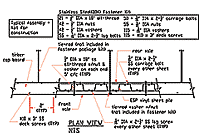
- Continue installation by installing front or back waler to wall utilizing carriage bolts or all-thread(AT) rod. Carriage bolts(or AT) should be used every 2’ –3’ between tie rods.

Securing waler boards - The tie rods will be secured through the front and back waler to a deadman behind the wall.

Tie Rods secured to dead men - Complete the process by fastening the top cap board. This board is generally a 2 x 12 pressure treated board or deck boards that run perpendicular to the walers.

Top Cap
Inquire today about accessories for your seawall that E.S.P offers. We inventory a large supply of both hot dipped galvanized and stainless steel fasteners, tie rods, carriage bolts, nuts, washers, and all thread rod. Let Everlast Synthetic Products be your one stop depot for all of your seawall installation needs.


